언제나 프로그램의 시작은 Hello World 죠~
three js 에서는 헬로 큐브로 하는것 같아요~ 말그대로 입체화된 3D 사각모형을 보여주는 것으로 대부분 시작합니다.
우선 간단히 Style 을 아래와 같이 합니다.
* {
   margin: 0;
   padding: 0;
   box-sizing: border-box;
   font-family: -applesystem, sans-serif;
}
html,
body {
   height: 100vh;
   width: 100vw;
}
#threejs-container {
   position: block;
   width: 100%;
   height: 100%;
}
그리고 div 컨텐츠 three js 에서 동적생성할 canvas를 담을 html을 작성합니다.
그리고 Threejs 에 CDN을 아래와 같이 가져옵니다.
<script async="" src="https://unpkg.com/es-module-shims@1.8.0/dist/es-module-shims.js"></script><script type="importmap">
{
   "imports": {
      "three": "https://unpkg.com/three@v0.149.0/build/three.module.js",
      "three/addons/": "https://unpkg.com/three@v0.149.0/examples/jsm/"
   }
}
</script>
그리고 이제 앞으로 작성할 것들은 #thressjs-container 에 three js 객체를 담는 것입니다.
우선 script type="module"로 정의해서 import, export 구문을 사용할 수 있도록 합니다.
<script type="module">
  import * as THREE from 'three';
  import { GLTFLoader } from 'three/addons/loaders/GLTFLoader.js';
</script>
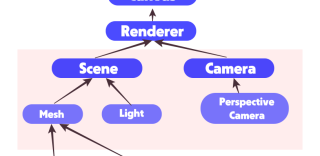
우선 Scene 를 생성합니다.
  // 씬 객체 생성
  const scene = new THREE.Scene()
  // Scene 백그라운드 색상 정의
  scene.background = new THREE.Color(0x262626)
그 다음 Camera를 설정합니다.
카메라는 원근감 있는 PerspectiveCamera 로 설정 합니다.
인자값은 아래와 같습니다.
PerspectiveCamera( fov : Number, aspect : Number, near : Number, far : Number )
![![image]](https://seq.kr/data/editor/2309/2036721195_1695052784.6436.png)
Fov : 시야각 (보통 45도를 제일 많이 씁니다. )
Aspect : 화면비율 (보통 현재 보고 있는 브라우저의 크기로 설정( width / height )로 설정을 많이 함)
Near : 위 그림과 같이 Near로 설정한 값 앞으로는 보이지 않게 됩니다. 카메라가 보이게 하는 시작점의 위치를 뜻합니다. 보통 0.1을 많이 사용함
Far : Near와 마찬가지로 카메라의 마지막 지점의 위치를 설정하여 렌더링할 Near ~ Far 구간사이의 오브젝트 들만 보이게 한다는 뜻입니다. 보통 가장 추천하는 값은 1,000 입니다.
let width = window.innerWidth // 윈도우 창 가로크기
let height = window.innerHeight // 윈도우 창 세로크기

// Fov 45도 시야각, Aspect 화면의 비율, Near 값 0.1, Far값 1000
const camera = new THREE.PerspectiveCamera(45, width / height,0.1, 1000)
camera.position.set(0, 0, 20)
카메라(camera) 객체에 카메라 위치(position)를 설정(set)할 수 있습니다.
camera.position.set(x, y, z) 값을 설정합니다.
x가 양수(3) 일경우 가로기준에서 좌측으로 이동, x가 음수(-3) 일경우 가로기준 우측으로 이동
y가 양수(3) 일경우 세로기준 밑으로 이동, x가 음수(-3) 일경우 세로기준 위로 이동
z가 0 일경우에는 카메라 시점이 Object와 닿아있습니다. 별도로 object에 position을 설정하지 않는 이상 보통은 멀리서 떨어져보이게 하려면 양수(10)의 값을 입력합니다. z의 숫자가 커질수록 Object를 멀리서 보이는것처럼 설정 됩니다.
다음으로 Geometry를 이용하여 도형객체를 생성할 수 있습니다. Three js 코어에서는 다양한 모양의 기본 도형을 제공합니다. 그 중에 BoxGeometry를 이용하여 Cube 사각형 모양의 객체를 생성합니다.
박스 생성 시 인자값으로는 크기를 던집니다.
BoxGeometry(가로크기, 세로크기,높이크기)
또한 MeshBasicMaterial 를 이용하여 생성된 모양(object)에 색상이나 와이어프레임(뚫린 형태)재질을 입힐 수 있습니다. 인자값으로는 Object를 던집니다.
// 사각형 모양, BoxGeometry(2, 2, 2)
const geometry = new THREE.BoxGeometry(2, 2, 2)

// 재질 설정 Object (색상, 와이어프레임형태 true)
const cubeSet = {
   color: 0xffffff,
   wireframe: true
}
// 재질 material Object 정의
const material = new THREE.MeshBasicMaterial(cubeSet)
Geometry와 Material 를 인자로 던져서 실제로 Scene 에 추가할 3d object 즉 Mesh를 정의합니다.
Mesh 를 Scene 에 추가(add)하여 다양한 Object를 보여줄 수 있습니다.
// cube = Mesh(모양객체, 재질객체)
const cube = new THREE.Mesh(geometry, material)
// Scene 에 Cube 모양 추가
scene.add(cube)
렌더러를 정의합니다. 내장객체인 WebGL1Renderer로 정의,
렌더링할 사이즈를 지정(setSize)하고, 픽셀 비율을 조정(setPixelRatio)합니다. 보통 픽셀 비율조정(setPixelRatio) 시 최적의 렌더링 성능을 내기 위해서 Math.min을 사용해 수치를 2로 제한합니다.
const renderer = new THREE.WebGL1Renderer({antialias:true})
renderer.setSize(width, height)
renderer.setPixelRatio(Math.min(window.devicePixelRatio, 2))
렌더러는 모든 준비를 마친 Scene와 Camera 객체를 인자로 받아서
씬을 설정한 카메라로 html 컨테이너에 렌더링 합니다.
// 컨테이너 정의
const container = document.querySelector('#threejs-container')
// 컨테이너에 렌더러 객체 추가(append)
container.append(renderer.domElement)
// 렌더러에 렌더로 설정한 씬과 카메라 인자로 던짐
renderer.render(scene, camera)
위와 같이 하면, 아주 못난 모양의 멈춰진 3d 객체가 그려집니다. 다만 별도로 움직임 효과를 주지 않아서 별로 모양새가 안나서 아래와 같이 animation 사용자 정의함수를 작성하고, 그안에 자바스크립트 내장함수인 requestAnimationFrame으로 애니메이션을 설정할 수 있습니다. 가만보면 requestAnimationFrame 에 인자로 animate 함수 를 던져서 재귀함수로 계속 실행이 될수 있게 합니다. cube의 x,y값을 조정하여 움직이도록 설정합니다.
// 애니메이션 함수
function animate() {
  // requestAnimationFrame : 브라우저에서 애니메이션 구현시 사용되는 자바스크립트 내장함수, 인자값으로 콜백함수 던짐.
  requestAnimationFrame(animate)
  // 큐브객체 x 값을 0.005 씩 증가시켜 큐브객체 를 가로회전(rotation x)
  // 큐브객체 y 값을 0.01  씩 증가시켜 큐브객체 를 세로회전(rotation x)
  cube.rotation.x += 0.005
  cube.rotation.y += 0.01
  // cube의 변화된 정보를 담고 있는 scene을 렌더러에 던지고, 변화된 씬으로 재 렌더링
  renderer.render(scene, camera)
}
// animate 함수 실행
animate()
전체 소스
<!DOCTYPE html>
<html lang="en">
	<head>
		<meta charset="utf-8">
		<title>My first three.js app</title>
		<style>
         * {
            margin: 0;
            padding: 0;
            box-sizing: border-box;
            font-family: -applesystem, sans-serif;
         }
         html,
         body {
            height: 100vh;
            width: 100vw;
         }
         #threejs-container {
            position: block;
            width: 100%;
            height: 100%;
         }
		</style>
	</head>
	<body>

      <div id="threejs-container"></div>

		<script async src="https://unpkg.com/es-module-shims@1.8.0/dist/es-module-shims.js"></script>

      <script type="importmap">
      {
         "imports": {
            "three": "https://unpkg.com/three@v0.149.0/build/three.module.js",
            "three/addons/": "https://unpkg.com/three@v0.149.0/examples/jsm/"
         }
      }
      </script>
      <script type="module">
         import * as THREE from 'three';
         import { GLTFLoader } from 'three/addons/loaders/GLTFLoader.js';

         // 씬 객체 생성
         const scene = new THREE.Scene()
         // Scene 백그라운드 색상 정의
         scene.background = new THREE.Color(0x262626)

         let width = window.innerWidth // 윈도우 창 가로크기
         let height = window.innerHeight // 윈도우 창 세로크기

         // Fov 45도 시야각, Aspect 화면의 비율, Near 값 0.1, Far값 1000
         const camera = new THREE.PerspectiveCamera(45, width / height,0.1, 1000)
         camera.position.set(0, 0, 10)
         // 사각형 모양, BoxGeometry(2, 2, 2)
         const geometry = new THREE.BoxGeometry(2, 2, 2)

         // 재질 설정 Object (색상, 와이어프레임형태 true)
         const cubeSet = {
            color: 0xffffff,
            wireframe: true
         }
         // 재질 material Object 정의
         const material = new THREE.MeshBasicMaterial(cubeSet)

         // cube = Mesh(모양객체, 재질객체)
         const cube = new THREE.Mesh(geometry, material)
         // Scene 에 Cube 모양 추가
         scene.add(cube)


         // 반응형 소스
         window.addEventListener('resize', () => {
            width = window.innerWidth
            height = window.innerHeight
            camera.aspect = width / height
            camera.updateProjectionMatrix()
            renderer.setSize(window.innerWidth, window.innerHeight)
            renderer.render(scene, camera)
         })


         const renderer = new THREE.WebGL1Renderer({antialias:true})
         renderer.setSize(width, height)
         renderer.setPixelRatio(Math.min(window.devicePixelRatio, 2))


         // 컨테이너 정의
         const container = document.querySelector('#threejs-container')
         // 컨테이너에 렌더러 객체 추가(append)
         container.append(renderer.domElement)
         // 렌더러에 렌더로 설정한 씬과 카메라 인자로 던짐
         renderer.render(scene, camera)


         // 애니메이션 함수
         function animate() {
         // requestAnimationFrame : 브라우저에서 애니메이션 구현시 사용되는 자바스크립트 내장함수, 인자값으로 콜백함수 던짐.
         requestAnimationFrame(animate)
         // 큐브객체 x 값을 0.005 씩 증가시켜 큐브객체 를 가로회전(rotation x)
         // 큐브객체 y 값을 0.01  씩 증가시켜 큐브객체 를 세로회전(rotation x)
         cube.rotation.x += 0.005
         cube.rotation.y += 0.01
         // cube의 변화된 정보를 담고 있는 scene을 렌더러에 던지고, 변화된 씬으로 재 렌더링
         renderer.render(scene, camera)
         }
         // animate 함수 실행
         animate()
      </script>
	</body>
</html>
![![image]](https://seq.kr/data/editor/2309/2036721195_1695056379.2057.png)


![![image]](https://seq.kr/data/editor/2308/thumb-2036721195_1692891439.3534_320x156.png)